
Bedroom Lovin
Posted: April 17, 2013 Filed under: Home Renovation | Tags: hardwood floors, master bedroom Leave a commentHubs and I have been showing our master bedroom some lovin. We have a terrific master bedroom. It’s spacious and gets tons of morning light.
Earlier this month, we started laying hardwood floor upstairs. New flooring is a project we’ve been wanting to do since we moved in to our little house in the country. But when your house needs updating/renovating from top to bottom, you have to prioritize. It’s finally time for us to show our upstairs some lovin and I’m so excited we started in the master bedroom.
We started by tearing up the existing laminate. You can read more about that here. Before we started laying the new floor, we took time to freshen the ceiling paint, and select new a paint color for the walls. We chose Behr Soft Taupe–a warm brown/gray color. We only painted the top portion of the walls because we’ve decided to do wainscoting on the bottom half. Those of you who follow my blog know that plaster walls in our house have a textured skim coat. The skim coat is damaged in several places in the master bedroom so rather than hire a professional to fix the patches, we’re going to cover it up.
We also decided to make a few changes to our bed. To lay the new flooring, we had to take our bed apart and move it out of the way. Our bed was designed to sit higher than the average. I even had little stairs to climb up in to it. When we put it back together, we decided not to use the box spring. Instead hubs screwed a platform to the bed slats for the mattress to sit on. It’s looks totally great. Our headboard is beautiful and you can see so much more of it now that the mattress doesn’t sit so high.
We’re still a long way from done in our master bedroom, but it’s wonderful to see we’re making progress. In addition to the wainscoting, we’ll be adding moldings and trim, new closet doors, and drapery. At some point, a few new pieces of furniture will complete the room. Until then…
Sayonara
Posted: April 3, 2013 Filed under: Home Renovation | Tags: flooring, hardwood, master bedroom 1 CommentYes, I did have to look up how to spell SAYONARA. This is a very exciting post for me. Hubs and I have been renovating our little house in the country, well, since we moved in over two years ago. We had to take a little break from our progress while I was pregnant. But now that our little bundle of joy is here, we’re refocusing on our home. First up…hardwood flooring for upstairs! I’m so excited!
Our bedrooms, several closets and two bathrooms are located on our upper level. With the exception of our bathrooms and master bedroom, the upstairs has been without flooring essentially since we moved in. The smaller bedrooms had carpet that reeked of dog urine. No amount of cleaning was going to get the smell out. So we ripped it out leaving the sub-floor exposed. We also tore up some seriously dated vinyl tile flooring on the landing at the top of the stairs. This is the way it’s been since we moved in.
We knew we wanted hardwood flooring. It’s beautiful and lasting. Some prefer carpet in bedrooms, but with our dog, I’ve found hard surface flooring much easy to keep clean. Carpet just collects too much hair. Plus, it’s easy to find rugs for those spots that need to be a little softer under foot.
The hardwood flooring arrived and spent a few weeks acclimatizing to our house. Hubs wants to start laying the new flooring from the back of the house, so that meant it was finally time to remove the laminate flooring from our master bedroom. Before we could start removing the floor, we had to remove furniture and items from the floor. And so it begins…
Plus one
Posted: October 15, 2012 Filed under: Home Renovation | Tags: baby's room, bedroom, chevron 1 CommentAnd, baby makes three! Most of our family and close friends already know…hubs and I are expecting our first little one before the end of the year. Certainly a lot of change, not just in our lives, but our home as well. Getting ready for baby has been both exciting and overwhelming. Take a look at a few of the changes taking place.
-

- The light fixture! Can’t wait to install this.
-

- Getting things in order for our little one’s arrival.
-

- Up close with a look at the new outlet plates.
-

- From another angle. Hubs want to add crown and base moldings, too.

-

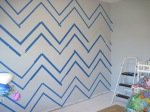
- After removing the tape! They look so great!

-

- The baby’s room is full of bright colors but I selected an apple green and sunny yellow for the chevron stripes.
-

- A quick prime before adding color.
-
- Luckily, I had help with the prep. Moms came up to visit and did the bulk of the measuring and taping.
-

- I blame Pintrest for my burning desire to paint chevron walls.
-

- Drawer liner…okay, really it’s just wrapping paper. I didn’t want to line the drawers with anything that might be scented for fear it would cling to the baby’s tiny clothes and irritate her (yes, it’s a her) skin.


-

- Basic white. Good for a girl or boy.
-

- One really great thing about being the last of your friends and siblings to have children is all the great hand-me-downs. This bureau was passed down through hubs’ family. It’s seen many a transformation and coats of paint.
-

- Once we found out we were preggers, it was time to make some changes.
-

- Ironically, hubs brought home a baby changing table and stored it in this room long before our little one was on the way.
-

- We selected a nice neutral color for our upstairs bedrooms.
-

- So, the carpet was the first thing to go.
-

- I’m certain the previous homeowners just let their dogs pee inside. The carpet in both of our upstairs bedrooms reeked of dog urine.
-

- The room didn’t look so bad, right? But, oh if you could have smelled it.
-

- In the beginning…This is the upstairs bedroom, the one we selected for the baby’s room, looked like when we first moved into our little house in the country.
Summertime
Posted: July 31, 2012 Filed under: Home Renovation | Tags: swimming pool 2 CommentsAnd the living’s easy… Nothing makes summertime easier than a swimming pool. What? I never mentioned we had a swimming pool? Oh well, that’s because until recently, there’s no way anyone would have mistaken the black swamp just out our back door as a swimming pool.
When hubby and I moved into our little-house-in-the-country two summers ago, we uncovered the pool. Then, we quickly decided to cover it back up and wait until next year. This summer though, I was determined to open the pool at all cost–no matter what might be dead (or alive?) under the black, murky water.

I looked and looked for a “before” picture of the pool, but couldn’t find one. Believe me folks, I’m doing you a favor. This is a glance of the water after our first pool consultation which turned out to be a bit of a game to see who could find the right combination of pool chemicals to clear the murk from the water to see the bottom of the pool. Turns out it’s difficult to evaluate the condition of a 20+ year old concrete pool when you can’t see below the surface. I prayed there wasn’t a dead ground hog, opossum, deer or other mammal buried in the murk at the bottom.
After that first consultation, hubby and I called in the big guns for some serious evaluation. Turns out the pool wasn’t really as bad as we thought it might be given its age and recent lack of maintenance. The pool folks definitely recommended an overhaul, but two of the three thought we could probably make it a few seasons with some minor repairs and serious cleaning, as long as we weren’t too worried about aesthetics. Hello solution! That’s what I like to hear. With all the confidence of two pool rookies, hubby and I (well, mostly hubby) set out to get this puppy open.
Christmas in July
Posted: July 25, 2012 Filed under: Home Renovation | Tags: Barn Light Electric, dining room table, kitchen light, Nags Head Hammocks, Sensenig's, sunroom, Zimmerman Chair Company 3 CommentsThere’s nothing quick about home renovation. Or, at least there’s nothing quick about my home renovation. Weeks–no months–ago, hubby and I ordered a few items for our home including a light to hang above our kitchen table and a new dining room table. We ordered them so long ago, we practically forgot about them! Finally, things are arriving and it’s beginning to feel a lot like Christmas around here.
First the kitchen light…

The “Raven” 3-light chandelier from Barn Light Electric in rosewood.

Previously, a ceiling fan hung here. But when we renovated, we couldn’t find an attractive fan to fit the small scale of the eat-in kitchen dining area.

Since the kitchen stays fairly cool year round, we opted instead for a great hanging light sans ceiling fan.

The chandelier is hanging from a extended chain so we can center the light over the table once hubby finishes the built-in seating.
Now for the dining room table. Almost as soon as we started working on our living/dining room, I was ready to get a table. When we moved from North Carolina nearly three years ago, we sold our dining table. I loved it, but it just wasn’t worth moving into our downsized apartment in Central PA. So, we haven’t had a dining room table in nearly three years. Maybe it’s just a table to you, but to me, it’s family holidays, new memories, and time well spent with loved ones.

The “Tuscany” trestle table in cherry from Zimmerman Chair Company. We purchased ours from Sensenig’s Furniture in New Holland, Pa.

We also ordered the extension wings for family gatherings. Eventually, I’d like to purchase a few more chairs as well. The side chairs are “Chalet” and the arm chairs are “Manor House.” Again, both by Zimmerman Chair Company.
Lastly, while on vacation in the Outer Banks, we purchased a Curved Arm Canvas Double Swing from Nags Head Hammocks for our sun room. Okay, we really didn’t have to wait long for this one. It was delivered the day we arrived home from vacation. It’s like we brought a little piece of the beach home with us. This swing is seriously comfortable. I know there will be many a long, summer afternoon naps on it in my future.


July…when did it get to be July? The summer is going by way to fast. Lots more renovation and country living updates to come.
Wash, prime, paint
Posted: April 25, 2012 Filed under: Home Renovation | Tags: exterior, landscaping, paint 1 CommentDuring the winter months, the exterior of our house is very much out of sight, out of mind. But with all this beautiful weather (current week excluded), hubby and I have been spending a lot more time outside. The extra time is reminding us just how much we HATE the color of our house.
Our house has a great shape, structure, size and layout–really everything we were looking for in a house. But the whole house, inside and out, needed love. The previous owners put minimal effort and maintenance into the house. Add on top of that the house had been vacant for nearly two years by the time we purchased it and you can imagine the work it needed.
Fortunately for us, the hideous aluminum siding is actually in pretty good shape even if the color doesn’t really fit us. A good power wash, prime and paint will go a long way.
Progress
Posted: April 24, 2012 Filed under: Home Renovation | Tags: dining room, hardwood floors, living room, refinish floors 4 CommentsSlowly, but surely…we’re making progress. After spending so much time in the kitchen over the past year, it’s been fun to focus on other areas of the house including our living/dining room. It’s been a while since I blogged about this room. My mom helped us get a big jump start on the living/dining room over the summer by freshening up the wall and ceiling paint. Time and again, I’m amazed what a difference paint makes. If you missed that post, you can catch up on it here as well as get a glimpse of what the living/dining room looked like when we moved in.
After paint, floors were next on the list of items to update. We have solid oak hardwood in the living/dining room, but the finish was in poor shape. It was worn through to the wood in some areas especially around the sliding glass door. We liked the hardwood so decided to refinish instead of replace. Take a look…
Island
Posted: February 16, 2012 Filed under: Home Renovation | Tags: island, kitchen Leave a commentWay back when we first started thinking about our kitchen renovation, our designer suggested installing a small, kitchen island. Sure they’re practical, but I was hesitant to install a permanent structure in the middle of our kitchen. Hubby and I are pretty serious cooks (well, at least hubby is) so it wasn’t as if we couldn’t use the extra prep space. But islands are popular and trendy right now–that doesn’t mean they always will be. After some back and forth, we finally decided instead for something a little more flexible. Take a look…
-

- It’s practical for food prep and the dark finish creates a great contrast with the white kitchen cabinets.
-

- Ta da! Love our new kitchen island.
-

- A couple of screws later, and…
-

- Making sure all the edges are even.


-

- It needed a little cleaning some and some adjustments to fit the island properly.

-

- Hubby found this butcher block at a salvage warehouse and thought it would make the perfect island topper.
-

- The locking mechanism on the casters prevent the island from moving during food preparation.
-

- The casters make it easy to move, giving us flexibility in the space.
-

- So we got some sturdy casters with locking mechanisms to give the island extra height.
-

- But the table was unusually low for an island. It needed extra height to be level with the countertops.
-

- Underneath years of dust, we found a great table, with a unique shape and practical, lower shelf.
-

- It started with this table, which we thought would make a great kitchen island.
Extreme bathroom makeover
Posted: December 21, 2011 Filed under: Home Renovation | Tags: bathroom, black and white, upstairs bathroom Leave a comment
Yesterday I mentioned my mom house-sitted while hubby and I were away on vacation. My mom has visited a number of times since hubby and I moved into our little house in the country and has been the most vocal complainer about our upstairs guest bath.
You can’t argue with her though—it’s pretty hideous. Our house was built in the 1970’s when, apparently, cast iron blue tubs were all the rage. Yes, you read that right. CAST IRON BLUE TUB! It must also have been a time when humans were shorter because the tub seems unusually small (and this coming from someone who doesn’t stand much over 5 feet).

I’m getting off track… Naturally no 1970’s bathroom would be complete without matching tile floor, which as you might have guessed, is also blue (okay, blue and light blue checkered). The blue and light blue tile was actually an improvement to the bathroom.
When we first moved in, the previous owners had the ugliest vinyl sheet flooring over top of the blue and white tile. It wasn’t really even secured to the floor—just kinda resting on top. I was pretty excited to roll it up and discover that at least a some point in time, a previous owner cared enough to coordinate the bathroom floor and tub.
Still, none of this explains the sh!#-stain vanity and the pink-orange vomit paint. I can’t begin to know or understand what the previous owners were thinking.
It was in fact, the vomit-paint that mom found most offensive. It is the guest bathroom, after all, so it’s pretty easy for hubby and I to just shut the door and worry about it another day. But my mom just couldn’t take it anymore. So during her recent stay, she decided to surprise us with her version of extreme bathroom makeover. Perhaps it wasn’t so extreme—a little new paint, some new accessories, but certainly a dramatic change.
 She went with a simple black and white color scheme. She had asked me before what I thought I might do in the bathroom and I had talked to her about a black and white theme. It really started with the tub. The tub is cast iron so it will last forever. Plus, it must weigh a 1,000 lbs. I’d have to tear my house apart to get it out, I’m sure. One of hubby’s friends mentioned you can get cast iron refinished. White just seems like the easiest choice. The more I thought about it though, the more appealing the idea of a black and white theme seemed. It’s a classic color combination, easy to update and refresh, appropriate for kids or guests.
 While the bathroom will certainly see more renovation in its future, mom’s extreme bathroom makeover certainly gave us something more pleasant in the meantime. Goodbye vomit-paint, hello crisp white walls and sharp, black trim. Sh!#-stain vanity has been subdued with attractive, new accessories. I especially like the mirror which got a coat of black paint and looks better than ever.
After I took it all in, I had to laugh at the little note mom left about the bathroom remarking on the three different kinds of trim in the small space as well as the door knob hardware which is brass on one side of the door and nickel on the other. Welcome to my world. Hubby and I have discovered these sorts of unique details all over the house which at times might more appropriately be described as rigged than anything else. Still, you work with whatcha got, right?
 Hubby and I were both super excited to see the surprise makeover. What a wonderful way to be welcomed home. Thanks again, mom. It looks great. Love you!
Hooked
Posted: November 1, 2011 Filed under: Home Renovation | Tags: hallway, hooks, laundry Leave a commentLife is in the details. Hubby has been hard at work in our laundry/hallway. I’ve blogged about this small, but very important space a number of times. In addition to our laundry area, it’s also the access to our most often used doorway, a small powder room and pantry. As you can imagine, this little spaces gets a lot of traffic. Take a look back at some of our renovations.
We have this unusual cubby in our laundry/hallway. When we first moved into our home, it housed ugly, dated cabinetry. Since the cabinetry didn’t provide useful storage for us, we decided to tear it out to provide some open space in this small, seemingly cluttered area. With the cabinetry gone, we had to decide what to do with the space. Hubby and I both agreed that it’s location made it ideal for housing items like coats and shoes with all our comings and goings through the hall. This week, we added hooks. Take a look…
